Installing MkDocs
Starting
This will be my first blog post, and I think it would be suitable to tell you how I installed MkDocs.
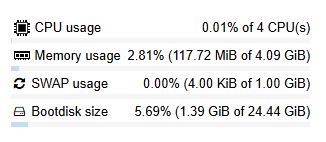
First of all make sure you have an environment you will run MkDocs on, maybe a computer with multiple services, or a separate vm/container. I prefer a separate container, so I have made one on my proxmox server. I couldn't find minimum specs so I gave my container:
- CPU: 4 Cores
- RAM: 4 GiB
- SWAP: 1 GiB
- Storage: 25 GiB
Go ahead and create the environment:
If you don't have pip:
Install pip with the following commands (assuming you have root access):
Install MkDocs
And install MkDocs with:
Creating a site
I assume you're only going to build 1 site, move to the directory where mkdocs will be installed, you can create the site with the following command:
The mkdocs.yml file will be the configuration file. My mkdocs.yml looks like below, but you can adjust it how you like according to the documentation.Directories
Once you have the mkdocs.yml like you want, you can really start building your site. Start by creating a directory named docs, in the folder the mkdocs.yml file is. In that folder you will place all the markdown files for the site. So go ahead and create the docs directory:
This index.md file will be the markdown file for the homepage of your site. Below I will post mine to show you how the layout works:Preview the site
Let's say you want to take a look at the site, to see what you can change. I do this all the time, to make sure it looks good, and I don't have to change big things later on. You can preview your site with the following command:
You can visit the site at the ip the server got from your router. I recommend setting a static IP, that way you can't lose your site in the DHCP. The IP for the site set is in the configuration file, with the following rule:Images and links
To link to a page you can use the following:
This is a link to google
So to explain it further, in the directory this file is located, I have a directory named 'installing-mkdocs', in that directory there is a file named 'resources.jpg'. There also are the statements width and height, I do that in percentages, because that way the image is always the same size across different devices.
Blog
As I discussed above, I have the directory blog, in this directory there is a index.md file. This file is the welcome page when you open the blog. This file is empty, because the blog plugin from my configuration file is automatically adding the post cards. The way this works, is in the blog directory, there is a directory called posts. In this directory, you create the individual posts, like this one.
On my site I add the author to my posts (which will be probably only be me), you do that by adding the following lines to the top of a post:
I also have added the date, and a category (this are the details from the top of this post). The authors section set the authors for this post, one or multiple, by a predefined authors.yml file. In the categories section, you can create categories. If you specify them here, they will be automatically added to the post and category list by the plugin. Make sure all lines are between the 3 dashes.The authors file looks like below, you name the authors file '.authors.yml'. With the dot before the name, you hide the file from the rest:
Continue Reading
I struggled with this at first, as I didn't know how to add it, but looking through the documentation I have found the setting. In the configuration file you must add the following:
In the 'text' I have, 'Continue Reading', you also must place the exact line as above in the post file, to separate the post.Titles and TOC
To create a Table Of Content, you have to write one or multiple titles. With hashtags (#), you create titles.
- 1 #, is a title that doesn't appear in the TOC
- 2 #, is a big title that does appear
- 3 # or more, is a title that appears as a sub
Adding code
To add code to the post, type 3 ` above and below the code you want to add in the post.
To add code line numbers, you have to add 'linenums="1"' after the 3 ` for each code block.
Note, normally, command line code doesn't need line numbering. Real code, like in a yaml file is nice to have.
Writing
For the file editing I use VSCode, once I have a md file I'm satisfied with, I delete the old one on my server, and move the new copied file from my PC to my server, via SCP.
For file transfer with SCP I use WinSCP. I have set up the same document layout as on my server, on my PC. That way I can just copy and move all the necessary files.
If SCP doesn't work
I had some problems with moving and accessing files, normally I just use SCP but it didn't work at the beginning. Apparently my sshd.config file was all commented out (like with the # in front of every rule), dont ask me why or how, but it was a new install. After uncommenting the file and setting the following rule to yes:
And doing a few commands: And by that SCP worked!
Building
Let's say you're done with writing your site, and you want to upload it to the web. The only thing you have to do with MkDocs is:
This will create a new folder named site, this contains all the necassary files for the static site. I'm going to explain how to build your site with your own webserver, as that's the way I do it.Nginx
First, go back to the root directory, install and enable nginx:
Now you should be able to see the welcome page as below, on the address of your server.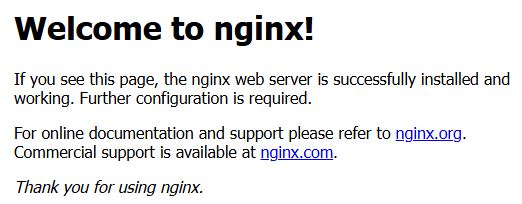
Configuration
Now, first delete the old html file and create the new configuration file:
This will be my configuration for the website, adjust the domain name and ip to your own:Below I will post the code of this post:
---
date: 2026-01-06
authors:
- joris
categories:
- Homelab - Services
---
# Installing MkDocs
## Starting
This will be my first blog post, and I think it would be suitable to tell you how I installed [MkDocs](https://squidfunk.github.io/mkdocs-material/).
First of all make sure you have an environment you will run MkDocs on, maybe a computer with multiple services, or a separate vm/container. I prefer a separate container, so I have made one on my proxmox server. I couldn't find minimum specs so I gave my container:
<!-- Continue Reading -->
- CPU: 4 Cores
- RAM: 4 GiB
- SWAP: 1 GiB
- Storage: 25 GiB
Go ahead and create the environment:
>### If you don't have pip:
>Install pip with the following commands (assuming you have root access):
>```
>apt update
>apt install python3
>apt install python3-pip python3-venv
>```
### Install MkDocs
And install MkDocs with:
## Creating a site
I assume you're only going to build 1 site, move to the directory where mkdocs will be installed, you can create the site with the following command:
The mkdocs.yml file will be the configuration file. My mkdocs.yml looks like below, but you can adjust it how you like according to the documentation.
```yml linenums="1"
site_name: Joris And His Giganotosaurus
site_url: #https://blog.giganotosaurus.nl
site_author: Joris Jansen
google_analytics:
theme:
  name: material
  favicon: images/dino.ico
  logo: images/dino-512.png
  language: en
  features:
#    - navigation.footer
    - navigation.tabs
    - navigation.tabs.sticky
    - navigation.expand
    - navigation.path
    - toc.follow
    - toc.integrate
    - navigation.top
    - content.code.copy
  icon:
    tag:
      mcu: material/antenna
extra:
  social:
    - icon: fontawesome/brands/linkedin
      link: https://www.linkedin.com/in/joris-jansen-230a321b5/
    - icon: fontawesome/brands/reddit
      link: https://www.reddit.com/user/reddit_user2917/
    - icon: fontawesome/brands/instagram
      link: https://www.instagram.com/_joris_jansen_/
    - icon: fontawesome/solid/paper-plane
      link: mailto:jorisjansen2006@gmail.com
  tags:
    esp32: mcu
nav:
  - Home: index.md
  - Blog:
    - Home: blog/index.md
  - About Me:
    - Myself: about-me/myself/index.md
    - My Job: about-me/job/index.md
    - My Homelab: about-me/my-homelab/index.md
use_directory_urls: false
dev_addr: '0.0.0.0:80'
plugins:
  - tags

  - blog:
      enabled: true
      blog_dir: blog
      blog_toc: true
      post_date_format: medium
      post_url_date_format: yyyy
      post_url_format: "{file}"
      post_readtime: true
      archive: true
      archive_url_date_format: yyyy
      archive_url_format: "archive/{date}"
      categories: true
      categories_name: Categories
      categories_url_format: "category/{slug}"
      post_excerpt_separator: <!-- Continue Reading -->
validation:
  links:
    unrecognized_links: ignore
markdown_extensions:
  - pymdownx.highlight:
      anchor_linenums: true
      line_spans: __span
      pygments_lang_class: true
  - pymdownx.inlinehilite
  - pymdownx.snippets
  - pymdownx.superfences
Directories
Once you have the mkdocs.yml like you want, you can really start building your site. Start by creating a directory named docs, in the folder the mkdocs.yml file is. In that folder you will place all the markdown files for the site. So go ahead and create the docs directory:
This index.md file will be the markdown file for the homepage of your site. Below I will post mine to show you how the layout works:Preview the site
Let's say you want to take a look at the site, to see what you can change. I do this all the time, to make sure it looks good, and I don't have to change big things later on. You can preview your site with the following command:
You can visit the site at the ip the server got from your router. I recommend setting a static IP, that way you can't lose your site in the DHCP. The IP for the site set is in the configuration file, with the following rule:Images and links
To link to a page you can use the following:
This is a link to google
So to explain it further, in the directory this file is located, I have a directory named 'installing-mkdocs', in that directory there is a file named 'resources.jpg'. There also are the statements width and height, I do that in percentages, because that way the image is always the same size across different devices.
Blog
As I discussed above, I have the directory blog, in this directory there is a index.md file. This file is the welcome page when you open the blog. This file is empty, because the blog plugin from my configuration file is automatically adding the post cards. The way this works, is in the blog directory, there is a directory called posts. In this directory, you create the individual posts, like this one.
On my site I add the author to my posts (which will be probably only be me), you do that by adding the following lines to the top of a post:
I also have added the date, and a category (this are the details from the top of this post). The authors section set the authors for this post, one or multiple, by a predefined authors.yml file. In the categories section, you can create categories. If you specify them here, they will be automatically added to the post and category list by the plugin. Make sure all lines are between the 3 dashes.The authors file looks like below, you name the authors file '.authors.yml'. With the dot before the name, you hide the file from the rest:
Continue Reading
I struggled with this at first, as I didn't know how to add it, but looking through the documentation I have found the setting. In the configuration file you must add the following:
In the 'text' I have, 'Continue Reading', you also must place the exact line as above in the post file, to separate the post.Titles and TOC
To create a Table Of Content, you have to write one or multiple titles. With hashtags (#), you create titles.
- 1 #, is a title that doesn't appear in the TOC
- 2 #, is a big title that does appear
- 3 # or more, is a title that appears as a sub
Adding code
To add code to the post, type 3 ` above and below the code you want to add in the post.
To add code line numbers, you have to add 'linenums="1"' after the 3 ` for each code block.
Note, normally, command line code doesn't need line numbering. Real code, like in a yaml file is nice to have.
Writing
For the file editing I use VSCode, once I have a md file I'm satisfied with, I delete the old one on my server, and move the new copied file from my PC to my server, via SCP.
For file transfer with SCP I use WinSCP. I have set up the same document layout as on my server, on my PC. That way I can just copy and move all the necessary files.
If SCP doesn't work
I had some problems with moving and accessing files, normally I just use SCP but it didn't work at the beginning. Apparently my sshd.config file was all commented out (like with the # in front of every rule), dont ask me why or how, but it was a new install. After uncommenting the file and setting the following rule to yes:
And doing a few commands: And by that SCP worked!
Building
Let's say you're done with writing your site, and you want to upload it to the web. The only thing you have to do with MkDocs is:
This will create a new folder named site, this contains all the necassary files for the static site. I'm going to explain how to build your site with your own webserver, as that's the way I do it.Nginx
First, go back to the root directory, install and enable nginx:
Now you should be able to see the welcome page as below, on the address of your server.
Configuration
Now, first delete the old html file and create the new configuration file:
This will be my configuration for the website, adjust the domain name and ip to your own: